Craving something rich, chocolatey, and satisfying without reaching for a traditional candy bar? These homemade Keto Chocolate Cream Bites might become your new favorite sweet treat.
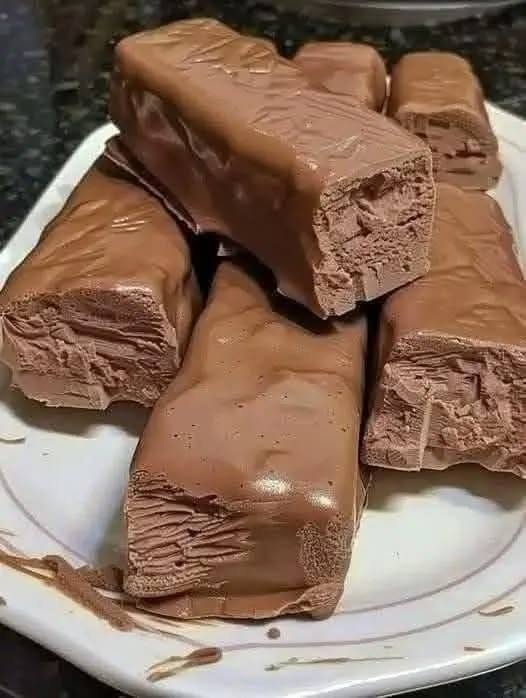
Imagine a soft, fluffy chocolate center with a delicate hint of vanilla, covered in a thin layer of crisp chocolate. Every bite combines two wonderful textures: a creamy filling that practically melts in your mouth and a chocolate coating that gives you that satisfying little crunch.
And here’s the best part: there’s no oven involved!
You simply whip together a few ingredients, shape the filling, let it chill until firm, and dip each piece into melted sugar-free chocolate. It’s an easy homemade dessert that feels a little indulgent without requiring complicated baking techniques.
Whether you’re following a low-carb lifestyle or simply looking for a different way to enjoy chocolate, these little bites are worth keeping in your refrigerator.
Why You’ll Love These Keto Chocolate Cream Bites
There are plenty of reasons to make room for this recipe in your homemade dessert collection.
- No baking required: Everything comes together without turning on the oven.
- Creamy, fluffy filling: Whipped cream and cream cheese create a soft, smooth center.
- A crisp chocolate shell: The outer coating adds a delicious contrast to the creamy filling.
- Easy to prepare ahead: Make a batch and keep it chilled until you’re ready to enjoy one.
- Customizable sweetness: Adjust the powdered sweetener and cocoa to suit your taste.
- Low-carb friendly ingredients: With carefully selected products, these treats can fit into a ketogenic eating plan.
Keto Chocolate Cream Bites Recipe
PREP TIME: 20 minutes | CHILLING TIME: 1–2 hours | TOTAL TIME: About 2 hours
COURSE: Dessert | METHOD: No-Bake | DIET: Keto-Friendly, Depending on Ingredients
Ingredients
For the Creamy Chocolate Filling:
- 4 oz (115 g) cream cheese, softened
- ½ cup heavy whipping cream, cold
- 2 tablespoons unsweetened cocoa powder
- ¼ cup powdered keto-friendly sweetener, or to taste
- 1 teaspoon vanilla extract
For the Chocolate Coating:
- 6–8 oz sugar-free chocolate, chopped
- 1–2 teaspoons coconut oil or cocoa butter
Note: The quantities above provide a practical starting point for this style of treat. Adjust the amount of chocolate coating depending on the size of your bites and how thick you want the shell.
Instructions
Step 1: Prepare the Cream Cheese Mixture
Place the softened cream cheese in a mixing bowl.
Add the unsweetened cocoa powder, powdered sweetener, and vanilla extract. Beat until the mixture becomes smooth and creamy, with no visible lumps.
Taste the mixture and adjust the sweetness if needed.
Using powdered sweetener helps create a smoother filling than granulated alternatives, which may leave a slightly grainy texture.
Step 2: Whip the Heavy Cream
In a separate chilled bowl, beat the cold heavy whipping cream until stiff peaks form.
Be careful not to overwhip it. You want a light, fluffy texture that holds its shape without becoming grainy.
Step 3: Fold Everything Together
Gently fold the whipped cream into the chocolate cream cheese mixture using a spatula.
Work slowly and avoid stirring too aggressively. The goal is to keep as much air in the whipped cream as possible.
Continue folding until the mixture is evenly combined and has a light, mousse-like consistency.
Step 4: Shape and Chill the Bites
Spoon the mixture into small portions and shape them into short bars or bite-sized pieces.
Arrange them on a parchment-lined baking sheet or tray.
Place the tray in the freezer until the pieces become firm enough to handle easily, usually about 1–2 hours depending on their size and shape.
This step is important. If the filling is too soft, it will be difficult to coat evenly with melted chocolate.
Step 5: Melt the Sugar-Free Chocolate
Place the chopped sugar-free chocolate in a microwave-safe bowl.
Heat in short intervals of about 15–20 seconds, stirring between each interval until smooth.
Alternatively, melt the chocolate gently using a double boiler.
Stir in the coconut oil or cocoa butter. This helps loosen the chocolate slightly, making it easier to dip the chilled filling.
Avoid overheating the chocolate, as it can become thick or lose its smooth texture.
Step 6: Dip the Chocolate Bites
Remove the firm filling pieces from the freezer.
Using a fork or dipping tool, lower each piece into the melted chocolate until completely coated.
Lift it out and allow the excess chocolate to drip back into the bowl.
Place each coated bite on a parchment-lined tray.
If the chocolate starts becoming too thick while you’re working, warm it gently for a few seconds and stir again.
Step 7: Let the Chocolate Shell Set
Transfer the coated bites to the refrigerator until the chocolate coating becomes firm.
Once set, they’re ready to enjoy!
For the best texture, let them sit at room temperature for a few minutes before serving.
Tips for Perfect Chocolate Cream Bites
For Complete Cooking STEPS Please Head On Over To Next Page Or Open button (>)